Warlock Guide — WoW MoP Classic

What Makes Warlock Special in MoP Classic?
Warlocks received one of the most thorough redesigns in WoW history going into Mists of Pandaria. Each specialization got its own secondary resource, making the three specs feel like entirely separate classes sharing a talent tree. The class brings consistent top-tier damage across all content types, strong utility that no other class duplicates, and one of the highest skill ceilings in the game for players who want to push rankings.
✓ Three specs that each excel in different content scenarios
✓ Unique utility: Demonic Gateway, Ritual of Summoning, Soulstone
✓ Exceptional multi-target and cleave damage (especially Affliction)
✓ Strong execute phases in all three specs
✓ Hardcoding Curse of the Elements brings 5% magic damage debuff to the raid
✓ Multiple specs can be stacked — Warlocks do not "compete" with each other for a slot
✗ DoT snapshotting (Affliction) requires constant attention to buff windows
✗ Movement punishes Demonology harder than most specs
✗ Destruction is front-loaded; bad opener timing bleeds into the whole fight
✗ Pet management adds another layer of complexity on top of the rotation
✗ Reforging optimization matters more than almost any other DPS class
Affliction — The DoT Surgeon
Affliction is a pure damage-over-time specialist powered by Soul Shards, a secondary resource generated from Drain Soul and Corruption ticks. The spec's defining challenge is maintaining several overlapping DoTs, snapshotting them under powerful buff windows, and spending Soul Shards on Haunt to amplify all of them simultaneously. Affliction has insanely high multi-target and cleave damage, making it exceptional on council fights and anything with adds that survive long enough to stack full DoTs.
Affliction Core Abilities
Affliction Single-Target Rotation
AoE Notes: Apply all three DoTs to any target that will survive at least 10-15 seconds. Use Seed of Corruption on large packs (4+) to spread Corruption on explosion. Soul Swap (with no cooldown in MoP) lets you copy a fully-stacked set of DoTs from your primary target onto new adds instantly.
Affliction Stat Priority: Hit Rating to 15% cap (5,100 rating) — Intellect — Haste to breakpoints (6,637 for extra Unstable Affliction and Corruption ticks) — Mastery — Critical Strike — excess Haste.
---
Demonology — The Demon Commander
Demonology is built around Demonic Fury, a resource generated through Shadow Bolt, Corruption, Hand of Gul'dan, and your demon's attacks. When you accumulate enough Demonic Fury, you shift into Metamorphosis, unlocking a completely different ability set that deals heavily amplified damage. Your job is to stay in demon form as much as possible — and to enter it loaded with active procs so your buff-snapshotted DoTs keep ticking at full power while you spam Touch of Chaos.
Demonology Core Abilities
Demonology Rotation Priority
AoE in Metamorphosis: Apply Corruption to all relevant targets, use Immolation Aura and Carrion Swarm, and fill with Void Ray. Apply Doom to any target surviving two or more ticks.
Demonology Stat Priority: Hit/Expertise to 15% cap — Haste to 12.5% (~3,036 rating; upgrade to 25% later at ~8,064) — Mastery Rating — Critical Strike Rating — excess Haste. Mastery is exceptionally powerful for Demonology because it scales both your Metamorphosis form and your pet's damage simultaneously.
---
Destruction — The Ember Spender
Destruction is the most straightforward of the three Warlock specs but demands tight execution on cooldown timing. The spec revolves around generating Burning Embers through Immolate ticks, Incinerate casts, and Conflagrate procs, then spending those embers on Chaos Bolt during trinket-proc and cooldown windows. A well-timed Chaos Bolt under full buffs hits for enormous damage; one wasted during a low-buff moment is a significant opportunity loss.

Destruction Core Abilities
Destruction Rotation Priority
Destruction Stat Priority: Hit Rating to 15% cap (5,100 rating) — Intellect — Mastery (amplifies Burning Embers spending, makes Chaos Bolt hit harder) — Haste to the first Immolate breakpoint (~2,021 rating for one extra tick) — Critical Strike — excess Haste after the first Immolate breakpoint.
---
How Do MoP Talents Work?
Mists of Pandaria introduced one of the most celebrated talent redesigns in WoW history. Gone are the old 31-point trees — instead, every Warlock spec shares the same six-tier talent tree, with three choices per tier unlocked at levels 15, 30, 45, 60, 75, and 90. You pick exactly one talent per tier, and most choices are genuinely competitive.
What Glyphs Should Warlocks Use?
Glyph of Healthstone — doubles the healing your healthstone provides (distributed over 10 seconds), keeping you alive through heavy AoE damage in progression.
Glyph of Soulstone — returns a resurrected player to life at full health instead of partial. A small but useful raid utility improvement.
Glyph of Demon Training — improves each demon's passive ability (Felguard gains cleave, Felhunter gains mana return, etc.), a consistent passive benefit for all content.
Glyph of Siphon Life — heals you for a portion of Corruption's damage, adding passive sustain on long multi-DoT fights.
Glyph of Healthstone — same doubling effect as the Affliction version; standard for any content where you take sustained damage.
Glyph of Siphon Life — pairs with Immolate for passive healing, providing sustain on long fight encounters with heavy raid-wide damage.
How Do Warlocks Gear for Siege of Orgrimmar?
Tier 16 — Regalia of the Horned Nightmare
Warlock Tier 16 pieces (Regalia of the Horned Nightmare) drop from Siege of Orgrimmar bosses and are the primary goal for every serious endgame player in Phase 5. The set bonuses are spec-specific, making the 4-piece a meaningful DPS upgrade for all three specs:
Demonology: Soul Fire has a 20% chance to increase your damage and your pet's damage by 20%.
Destruction: Conflagrate critical strikes have a 20% chance to increase the crit chance of Immolate and Incinerate by 10%.
Demonology: Shadow Bolt and Touch of Chaos have an 8% chance to also cast Hand of Gul'dan on the target for free.
Destruction: When a Burning Ember fills up completely, your Critical Strike Chance increases by 15% for 5 seconds.
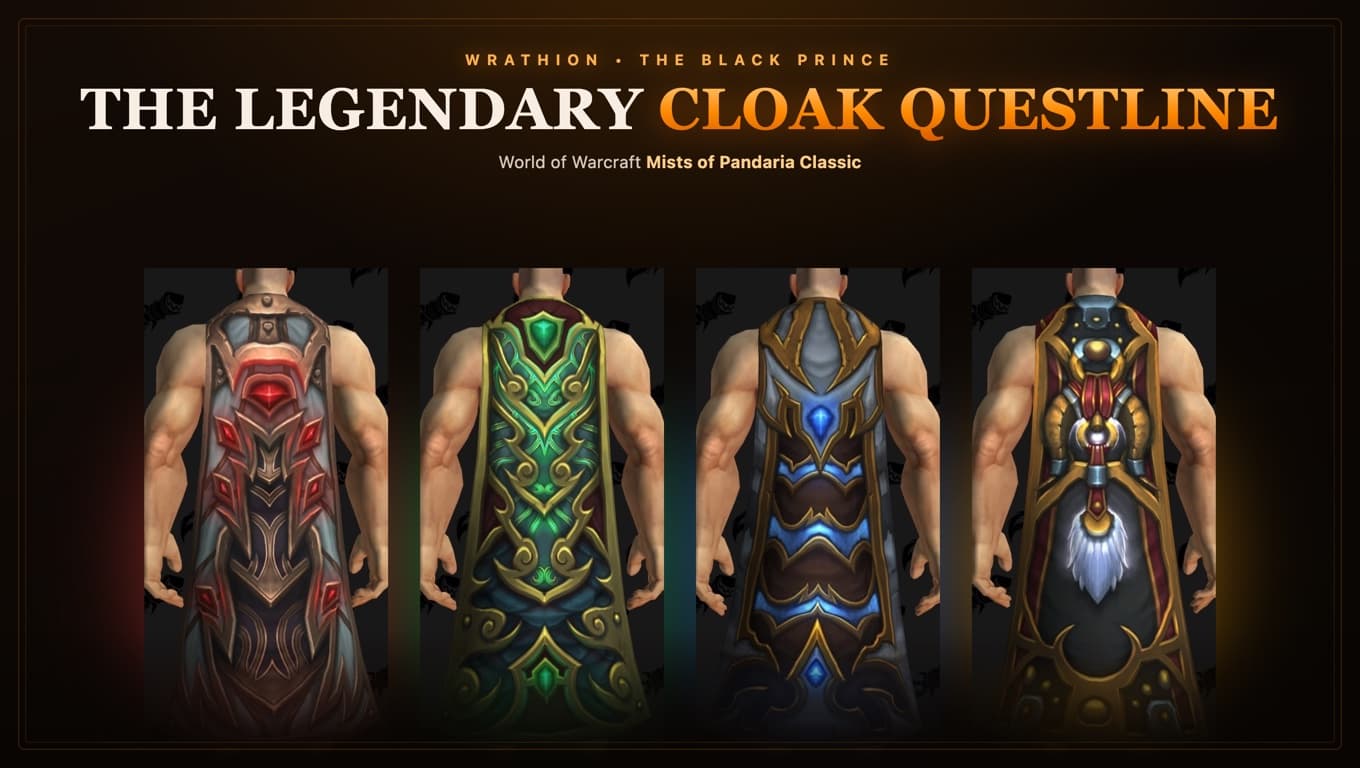
Legendary Cloak — Xing-Ho, Breath of Yu'lon
The Legendary Questline culminates in Phase 5 with Wrathion rewarding casters the cloak Xing-Ho, Breath of Yu'lon. This cloak is a dramatic upgrade for all Warlock specs, providing a significant amount of Intellect plus a proc that deals additional nature/fire damage based on your spell power. The questline involves collecting Secrets of the Empire, Titan Runestones from Throne of Thunder and Siege of Orgrimmar, and a solo scenario on the Timeless Isle. Prioritizing this quest is essential — players who complete it in the first weeks of a tier hold a noticeable advantage.
Valor and Reputation Gearing
Alongside Tier 16, Valor Points remain the primary currency for filling non-set slots. Purchase items from Shado-Pan Assault (friendly to exalted) vendors for rings, trinkets, and off-set pieces before your raid drops fill those slots. Granting yourself access to the 535+ item-level Shado-Pan Assault Valor gear requires reaching Friendly standing, which takes only a few Throne of Thunder kills.
Is Warlock Good for PvE and PvP?
PvE — Exceptional. All three Warlock specs rank among the strongest DPS performers throughout MoP Classic. Affliction dominates multi-target fights and anything with a long-duration add phase. Demonology pushes extremely high numbers on single-target encounters with clean Metamorphosis uptime. Destruction is the most burst-oriented spec and excels at shorter fights where you can align cooldowns with the entire fight window. Multiple Warlocks can fill a single raid without diminishing returns — this is rare among DPS classes and makes Warlock highly sought-after for progressive guilds.
PvP — Competitive. Affliction is the spec of choice for most Warlock PvP players in MoP. The combination of pressure DoTs, Haunt for burst windows, and strong defensive toolkit (Soul Link, Dark Bargain, Unending Resolve) gives Affliction one of the best sustained pressure kits in the game. Demonology has a niche presence due to Metamorphosis providing burst-window knockbacks and extra defensive forms. Destruction's lack of instant casts outside Conflagrate makes it harder to play into pressure from melee.
---
FAQ
What is the best Warlock spec for raiding Siege of Orgrimmar? All three specs are raid-viable at a high level. Affliction generally leads in multi-target output and on fights where adds survive long enough for DoTs to stack. Demonology is the top single-target spec when Metamorphosis uptime is clean and uninterrupted. Destruction is competitive on shorter encounters and any two-target cleave scenario with Havoc. For most players entering SoO progression, Affliction is the most forgiving spec to learn while still performing at a top-tier level.
What is the Hit cap for Warlocks in MoP Classic? The Hit cap is 15%, which requires 5,100 Hit Rating. Both Hit Rating and Expertise contribute to your Hit Chance as a Warlock in MoP. Every point over the cap is wasted, so reforge excess Hit into Mastery or Haste depending on your spec. The cap is the same for all three Warlock specs.
How does DoT snapshotting work for Affliction? When you apply a DoT in MoP Classic, its tick speed and power are calculated based on your active Haste buffs and spell power at the moment of application. If you cast Agony during Dark Soul: Misery (30% Haste), it gains extra ticks for its entire duration even after the Haste buff fades. The standard technique is to use Soulburn: Soul Swap to instantly apply all DoTs simultaneously inside Dark Soul: Misery and any trinket procs at the start of a fight, then re-snapshot when new procs align during the encounter.
How do I get the Legendary Cloak as a Warlock? The cloak comes from completing Wrathion's legendary questline, which includes gathering Secrets of the Empire (25 drops from Throne of Thunder), then Titan Runestones (12 drops from Throne of Thunder and Siege of Orgrimmar), then completing a solo scenario on the Timeless Isle. The caster cloak Xing-Ho, Breath of Yu'lon is the reward for Intelligence-based characters. The questline requires multiple weeks of raiding to complete due to the drop-rate gating on quest items.
What demon should I use as Demonology? The Felguard is the Demonology-exclusive demon and is always used as your primary pet. It deals the highest damage of any standard demon for this spec. With Grimoire of Service, you can summon a secondary Felhunter or Observer on a cooldown to provide a burst of extra damage or an interrupt, but your Felguard should never leave your side in PvE. Soul Link with the Felguard also provides the best passive damage reduction.
How many Warlocks can a raid bring? There is no practical cap. Warlock stacking is one of the features that made the class exceptionally popular in MoP raid groups — Curse of the Elements applies once per raid, but multiple Warlocks each contribute their full damage. Demonic Gateway, Ritual of Summoning, and Soulstone also scale in usefulness with multiple casters available. Many cutting-edge guilds in SoO ran three or more Warlocks.
---
Related Reading
- Siege of Orgrimmar Raid Guide — full boss breakdown for the Phase 5 raid where all Warlock Tier 16 drops
- MoP Classic Phase 5 Guide — everything new in Phase 5, legendary cloak finale, Flexible difficulty
- Mage Guide — MoP Classic — the other premier caster DPS, sharing the ranged slot with Warlocks
- Priest Guide — MoP Classic — Shadow Priest, the third shadow-school caster in the raid
- Shaman Guide — MoP Classic — Elemental spec for comparison as another top-tier ranged DPS
- Death Knight Guide — MoP Classic — melee DPS that often competes for the same raid slots on specific encounters