Arms, Fury, and Protection — all three Warrior specs in MoP Classic 5.4.8 covered in full: talents, rotations, stat priorities, Tier 16 set bonuses, and Siege of Orgrimmar gearing from Phase 5.

Class Guide · WoW MoP Classic · Patch 5.4.8
The Warrior is MoP Classic's most versatile melee class — capable of top-tier raid DPS as Arms or Fury, and a cornerstone of progression tanking as Protection. With the introduction of Active Mitigation in Pandaria, Protection Warrior became one of the most reactive and engaging tank specs in the game's history.
MoP Classic accounts featuring a geared Warrior command real demand headed into Siege of Orgrimmar.
What Makes Warrior Strong in MoP Classic?
Warriors entered Mists of Pandaria with one of the most overhauled ability sets in the game's history. Rage generation was reworked so that it flows more consistently, Sweeping Strikes costs zero Rage in 5.4.8, and all three specs share the same six-tier talent tree — meaning every Warrior benefits from the same powerful utility pool regardless of spec.
Arms stands out as the go-to spec for single-target raid DPS and PvP burst. Fury delivers slightly different flavor: a dual-wielding two-hander playstyle (or one-hander/two-hander combo) defined by Enrage uptime and Raging Blow charges. Protection arrived in MoP as one of the defining tanks of the expansion, with Shield Block and Shield Barrier giving tanks direct control over incoming damage rather than relying on passive avoidance alone.
Strengths
✓ Two strong DPS specs — Arms and Fury cover different raid situations
✓ Excellent burst windows through Colossus Smash across both DPS specs
✓ Protection is a premier tank — active mitigation model rewards skilled play
✓ Strong PvP pedigree: Arms is a perennial gladiator spec
✓ Shared talent tree gives outstanding utility to every spec
✓ Skull Banner raid cooldown adds meaningful group DPS contribution
✓ Sweeping Strikes (zero Rage in 5.4.8) makes Arms AoE extremely accessible
Weaknesses
✗ Melee-only — movement-heavy fights penalize all three specs
✗ Arms is heavily gear-dependent; falls behind early in a phase
✗ Fury's Enrage reliance means bad RNG streaks noticeably tank DPS
✗ Protection requires active attention to avoid "dropping" Shield Block windows
✗ No ranged interrupt — you must be in melee range to Pummel casters
✗ Leveling as Protection is noticeably slower than DPS specs
---
Arms Warrior — PvE DPS Guide
Arms is a two-handed weapon specialist defined by Colossus Smash vulnerability windows, consistent Deep Wounds bleed uptime, and one of the most satisfying Execute phases in the game. It performs reliably across all Siege of Orgrimmar difficulties and is the premier melee PvP spec in MoP Classic.
Arms Core Abilities

VULNERABILITY WINDOW — 20s CD
Debuffs the target so your attacks ignore a portion of their armor for 6 seconds. Every other ability orbits around maximizing the damage landed inside this window. Cast on cooldown — never delay it.
Arms' signature attack. Deals heavy weapon damage, keeps Deep Wounds rolling, and grants an Overpower proc. Cast on cooldown regardless of the Colossus Smash window — do not hold it.
Your primary Rage dump inside Colossus Smash windows. Spam Slam whenever the vulnerability debuff is active and your Rage allows. Outside of the window, use only at 100 Rage to avoid capping.
Triggered by Mortal Strike and dodge events. Costs no Rage and is unaffected by Colossus Smash, so fire it immediately on proc — do not queue it behind a Slam cast.
Available when the target falls below 20% health. Replaces Slam as your primary Rage dump. During Colossus Smash, spam Execute freely; outside it, hold until 90+ Rage for maximum value. Tier 16 4-piece can trigger Execute above 20% on some procs.
Spins for 6 seconds dealing weapon damage to all targets within 8 yards every second. The dominant Level 60 talent pick for Arms in any situation with 3+ enemies. Immune to crowd control while active.
Arms Single-Target Rotation Priority
| Priority | Ability | When and Why |
|---|
| 1 | Recklessness + Skull Banner (pull) | Stack both raid cooldowns on the opening Colossus Smash. Pop immediately on engage then line up Mortal Strike into Colossus Smash. |
| 2 | Colossus Smash | On cooldown, always. The 6-second window is when all your heaviest Slams and Mortal Strikes must land. |
| 3 | Mortal Strike | On cooldown. Refreshes Deep Wounds and generates Overpower. Cast even outside Colossus Smash — never delay it. |
| 4 | Overpower | Immediately on proc. Free damage — never hold it. Can chain-proc a second Overpower; spend both before casting Slam. |
| 5 | Slam | Spam during Colossus Smash. Outside the window, use at 100 Rage only to avoid capping — otherwise hold it. |
| 6 | Execute (sub-20%) | Replaces Slam as primary filler below 20%. Inside Colossus Smash, dump Rage freely; outside it, hold to 90+ Rage. The highest-damage phase of any fight. |
AoE note: Activate Sweeping Strikes immediately when two or more enemies are present. It costs no Rage in patch 5.4.8 and mirrors Mortal Strike hits to a nearby target automatically. Follow with Bladestorm on 3+ targets for maximum throughput. Thunder Clap spreads Deep Wounds to every hit target via Blood and Thunder.
Arms Stat Priority
Hit to 7.5% cap, then Expertise to 7.5% cap. After both caps: Strength > Critical Strike > Mastery > Haste. Strength scales all Warrior damage directly. Critical Strike is your top secondary because it boosts Deep Wounds value and procs more Overpower opportunities. Reforge excess Hit/Expertise into Crit first, then Mastery.
---
Fury Warrior — PvE DPS Guide
Fury is the Rage-hungry, dual-weapon specialist of the Warrior class. In MoP Classic, Fury commonly uses two two-handed weapons (Titan's Grip) — carrying the heaviest melee weapons in the game. The entire spec revolves around maintaining Enrage uptime through Bloodthirst crits, spending Raging Blow charges before they cap, and spiking damage inside Colossus Smash windows.
Fury Core Abilities
The heartbeat of Fury. Cast on every cooldown without exception. Critically striking with Bloodthirst triggers Enrage, which is the primary damage buff of the spec. Also provides a small self-heal — meaningful on progression.

ENRAGE-GATED — MAX 2 CHARGES
Available only while Enraged. Stores up to 2 charges. Spend both before Enrage expires or before a third charge would generate — wasted charges are wasted DPS. Highest-priority spender when charges are at max.
Primary Rage dump. Proc-based Bloodsurge makes it free and instant — always spend free procs immediately. Outside Bloodsurge, cast inside Colossus Smash windows or as a Rage dump when above the cap threshold.
Shared with Arms. Strips target armor for 6 seconds. Use on cooldown — every Bloodthirst, Raging Blow, and Wild Strike during the window hits noticeably harder.
Forces Enrage when not already active. Do not press on cooldown blindly — use only when you are not Enraged and a Bloodthirst crit is not imminent. Wasting it while Enraged is a DPS loss.
Fury Single-Target Rotation Priority
| Priority | Ability | Condition |
|---|
| 1 | Raging Blow | When sitting at 2 charges. Spend before a new charge generates — each wasted charge is permanent DPS loss. |
| 2 | Bloodthirst | On cooldown, always. Never delay it — every missed cast delays Enrage proc uptime and reduces Raging Blow availability. |
| 3 | Colossus Smash | On cooldown. Stack Bloodthirst and Raging Blow casts to land inside the 6-second armor debuff window. |
| 4 | Wild Strike (Bloodsurge proc) | Spend free instant procs immediately. These are bonus GCDs — never sit on them. |
| 5 | Berserker Rage | Only when Enrage is not active and a Bloodthirst crit is not expected in the next 1-2 seconds. |
| 6 | Wild Strike (filler) | Rage dump during Colossus Smash windows or when Rage approaches cap and Bloodthirst is on cooldown. |
AoE note: Fury AoE uses Whirlwind as the primary multi-target tool. Sweeping Strikes mirrors attacks for two-target cleave. On high-count packs, Whirlwind replaces Wild Strike in the priority and Dragon Roar (Level 60 talent) shines as an opener hitting all nearby targets.
Fury Stat Priority
Hit to 7.5% (special attacks), Expertise to 7.5%. After capping both: Strength > Critical Strike > Mastery > Haste. Crit is the premier secondary for Fury because it directly feeds Enrage uptime (via Bloodthirst) and activates Raging Blow. Mastery (Unshackled Fury) scales the Enrage damage bonus itself, making it valuable throughout the expansion. Haste trails well behind early in a phase; it gains more relative value at very high gear levels.
---
Protection Warrior — Tank Guide
Protection Warrior defines what "active mitigation tanking" means in MoP Classic. Unlike previous expansions where avoidance was king, Protection tanks spend Rage on Shield Block (physical damage reduction) and Shield Barrier (a magic-absorb shield), making every encounter a resource management puzzle on top of the threat rotation. Skilled Protection Warriors effectively cap Shield Block uptime against physical bosses, making incoming spike damage feel mechanical rather than random.
Protection Core Abilities

HIGHEST PRIORITY STRIKE — 6s CD
Your most important threat and damage ability. Cast on every cooldown without exception. It generates Rage, dispels one magic effect, and hits hard enough to anchor threat against any DPS in the raid.

PROC ON DODGE/PARRY — FREE
Procs when you dodge or parry an attack, costs minimal Rage, and cleaves two additional nearby targets. Spend immediately on proc — it is the spec's most efficient GCD and a significant threat tool in multi-target situations.

ACTIVE MITIGATION — PHYSICAL
Costs Rage, provides a significant chance to block attacks for 6 seconds. The cornerstone of physical damage mitigation. Maintain uptime between 60-80% of the fight. If both Shield Slam and Revenge are on cooldown, this is your next Rage expenditure.

ACTIVE MITIGATION — MAGIC
Costs Rage to place an absorb shield on yourself. Swap to this from Shield Block when facing magic-heavy damage phases or predictable boss nukes. Scales with Rage spent and Attack Power.
Hits all enemies within 8 yards, applies Weakened Blows (a critical attack speed debuff), and with Blood and Thunder spreads your Deep Wounds bleed. Cast on cooldown for both threat and the Weakened Blows debuff that significantly reduces incoming melee damage to the entire raid.
Filler ability between Shield Slam, Revenge, and Thunder Clap. Applies and refreshes the Sunder Armor debuff. Has a chance to reset Shield Slam cooldown via Sword and Board — always cast rather than letting GCDs go idle.
Protection Single-Target Rotation Priority
| Priority | Ability | Notes |
|---|
| 1 | Active Mitigation (Shield Block / Shield Barrier) | Keep one active at all times during heavy damage. Physical: Shield Block. Magic: Shield Barrier. Your first Rage expenditure after Shield Slam and Revenge. |
| 2 | Shield Slam | On cooldown. Your most important damage and Rage-generating ability. Generates a Sword and Board proc chance on Devastate. |
| 3 | Revenge | On proc. Free or cheap, high-priority. Never sit on it — the proc does not queue a second one while one is pending. |
| 4 | Thunder Clap | On cooldown. Critical for maintaining Weakened Blows on all nearby enemies, reducing the entire raid's incoming melee damage. |
| 5 | Devastate | Filler whenever other priorities are on cooldown. Stack Sunder Armor to 3 and maintain it. Sword and Board resets are a bonus. |
| 6 | Heroic Strike | Rage dump only when both mitigation cooldowns are covered and no other priority GCD is available. Never spend Rage on this before securing Shield Block or Shield Barrier. |
Protection Stat Priority
Hit to 7.5%, then Expertise to 15% (hard cap — avoids both dodge AND parry on front attacks). After caps: Parry and Dodge (balanced) > Critical Strike > Strength > Stamina > Mastery > Haste. Some progression teams prefer a Mastery-heavy build once Shield Block uptime is consistently managed, as Mastery (Critical Block) increases the chance for blocks to absorb the full hit. Stamina is less prioritized in MoP than in earlier expansions — survivability comes primarily from active mitigation, not raw health pool.
---
How Do MoP Classic Warrior Talents Work?
MoP introduced one of WoW's most celebrated talent systems. Every class has a single shared talent tree across all specs, with six tiers unlocking at levels 15, 30, 45, 60, 75, and 90. You choose one of three options per tier. The choices do not alter your core rotation — they augment mobility, utility, or cooldowns.
| Tier | Talents | Best Pick and Notes |
|---|
| Level 15 — Mobility | Juggernaut / Double Time / Warbringer | Double Time is the consensus PvE pick — two Charge stacks lets you cover large distances and gap-close on repositioned bosses. Warbringer is a PvP staple for its Charge root. Juggernaut extends Charge and Die by the Sword cooldowns (niche). |
| Level 30 — Self-Healing | Enraged Regeneration / Second Wind / Impending Victory | Impending Victory is the PvE default for Arms and Fury — an off-GCD heal tied to Victory Rush. Second Wind is the PvP go-to, passively regenerating health when below 35%. Enraged Regeneration is situational for Protection on specific progress encounters. |
| Level 45 — Disruption | Staggering Shout / Piercing Howl / Disrupting Shout | Disrupting Shout is the strongest PvE choice — interrupt all nearby enemies simultaneously, crucial on encounters with multiple casting mobs. Piercing Howl is valuable for kiting and slowing. Staggering Shout roots all low-health targets. |
| Level 60 — Burst / AoE | Bladestorm / Shockwave / Dragon Roar | Bladestorm dominates on any fight with 3+ enemies — 6 seconds of uncleansable AoE immunity. Shockwave is the Protection default — a frontal-cone stun that provides enormous control value for tank-and-pull situations. Dragon Roar hits all nearby targets and is sometimes used by DPS specs for burst stacking on single-target. |
| Level 75 — Group Defense | Mass Spell Reflection / Safeguard / Vigilance | Safeguard is the go-to for Protection and Arms in raid — charge to an ally and absorb 30% of the damage they take for a short duration. Mass Spell Reflection is invaluable on encounters with reflected magic. Vigilance redirects threat from an ally to you — mostly useful for off-tanks managing add threat. |
| Level 90 — Signature Power | Avatar / Bloodbath / Storm Bolt | Avatar transforms you, breaking roots and boosting damage for 24 seconds — excellent for Arms burst stacking on a Colossus Smash opener. Bloodbath applies a strong bleed that scales with every ability and is the top overall single-target DPS talent for sustained fight profiles. Storm Bolt is a 30-second CD stun — strong in PvP, situationally useful in PvE on encounter-specific stun opportunities. |
Talent swapping in MoP: You can swap talents between fights using a Tome of the Clear Mind (purchasable from vendors). Swap Bladestorm in for multi-target encounters, Storm Bolt for PvP, and Shockwave for Protection tanking. Flexibility is one of the best features of the 5.4.8 system.
---
What Glyphs Should Warriors Run?
Glyphs in MoP modify specific abilities without fundamentally altering specs. Major Glyphs provide the most meaningful gameplay impact.
Arms Major Glyphs
Glyph of Bull Rush
Charge generates 15 Rage. A hard lock for every Arms setup — the Rage boost is a direct rotation upgrade and meaningfully improves opener burst.
Glyph of Colossus Smash
Causes Colossus Smash to also apply a Sunder Armor effect. Valuable in groups without a dedicated Sunder Armor applicator — frees rotation globals for your DPS partners.
Glyph of Rude Interruption
Pummel interrupts increase your damage by 2% for 10 seconds. Pick this up on any encounter where interrupts are available — passive damage with no rotation cost.
Glyph of Unending Rage
Increases maximum Rage by 20. Useful on heavy-cooldown stacking encounters where you want to pre-pool Rage for a Colossus Smash window. Situational over Bull Rush.
Fury Major Glyphs
Glyph of Unending Rage
The Fury default. Extra Rage capacity means more Raging Blow casts and fewer Rage caps during burst phases — the strongest sustained DPS glyph for this spec.
Glyph of Colossus Smash
Same application as Arms — replaces the need for a dedicated Sunder applicator in the group. Bring it when no Arms Warrior or other Sunder source is present.
Glyph of Raging Wind
Whirlwind deals increased damage but consumes additional Rage. Pick this up specifically for multi-target encounters where you are spamming Whirlwind constantly.
Protection Major Glyphs
Glyph of Shield Wall
Reduces Shield Wall's cooldown significantly in exchange for a lower damage reduction percentage. Lets you use the cooldown more frequently on repeated heavy-damage mechanics across a fight.
Glyph of Cleave
Increases Cleave's target count. Valuable on any encounter with persistent add packs that need to be threat-held simultaneously — Siege of Orgrimmar has several such phases.
Glyph of Hindering Strikes
Heroic Strike slows the target's movement speed. Useful for kiting adds in specific Siege of Orgrimmar encounters without spending crowd-control talents on the encounter design.
---
How Do Warriors Gear for Siege of Orgrimmar?
Siege of Orgrimmar is the Phase 5 mega-raid and the main gearing path for every Warrior spec. It runs in three difficulty modes — Flexible, Normal (item level 553), and Heroic (item level 566) — allowing Warrior players of every skill level to progress through Tier 16 gear at their own pace. LFR was not carried over to MoP Classic; Flexible serves as the entry-level tier.
Tier 16 Set Bonuses
DPS (Arms and Fury) — Battleplate of the Prehistoric Marauder
2-Piece: Special attacks against a target under your Colossus Smash debuff generate 5 additional Rage. This significantly increases Slam and Execute throughput during your burst window.
4-Piece: Mortal Strike (Arms) and Bloodthirst (Fury) have a chance to activate Death Sentence — granting an Execute cast that functions above 20% health. The proc dramatically increases Execute usage across a full fight and is a major DPS increase for both specs.
Protection — Plate of the Prehistoric Marauder
2-Piece: You heal for 30% of all damage blocked by Shield Block and 30% of all damage absorbed by Shield Barrier. Meaningful passive sustain — especially on fights with sustained physical pressure where Shield Block uptime is high.
4-Piece: For 10 seconds after Demoralizing Shout falls off targets, you gain bonus Rage from taking damage. Helps smooth out Rage generation between Demoralizing Shout windows and ensures active mitigation stays covered during cooldown resets.
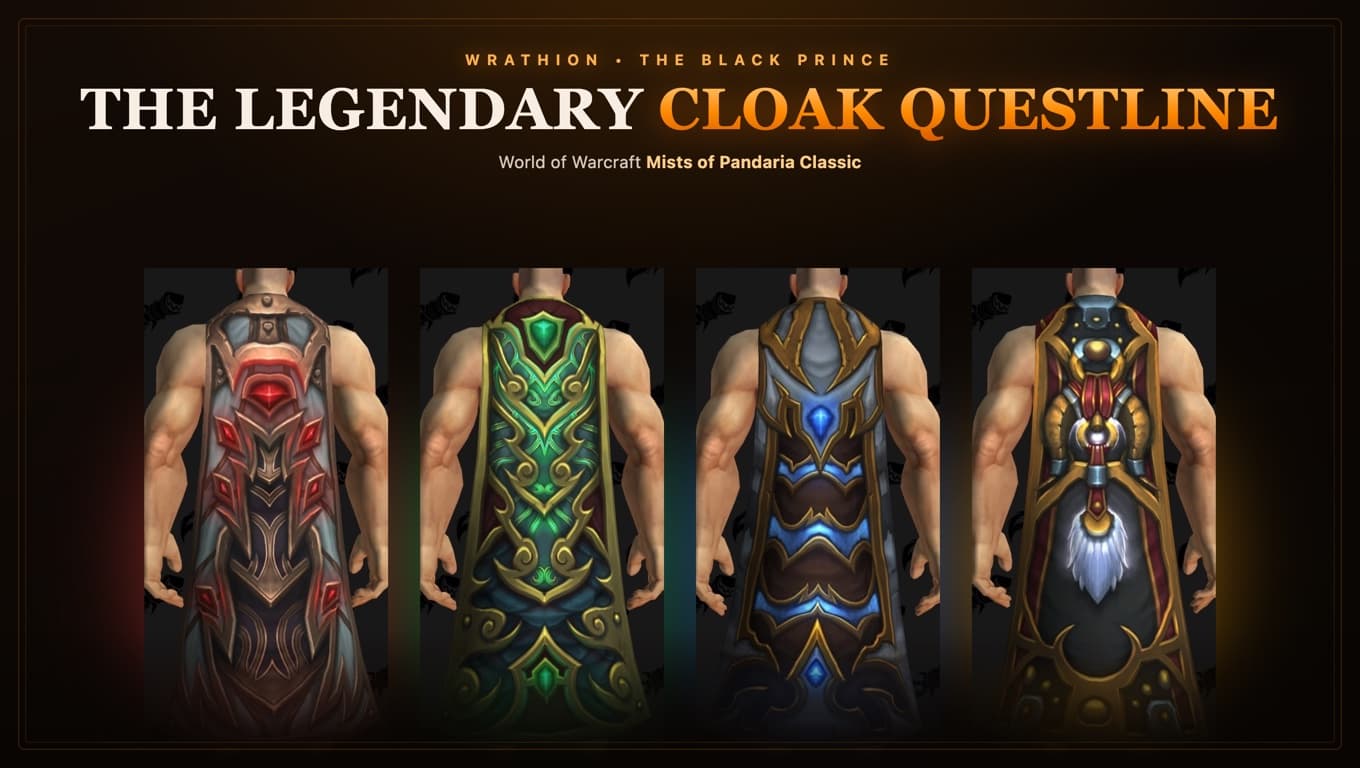
The Legendary Cloak
The Wrathion Legendary Questline culminates in Phase 5 with the Legendary Cloak — either Gong-Lu, Strength of Xuen (DPS cloaks for Arms and Fury with proc damage) or Qian-Ying, Fortitude of Niuzao (the tank cloak for Protection). Completing the cloak questline requires weeks of running SoO for runestones, proving grounds tests, and Wrathion's final challenge. Every serious Warrior should prioritize this chain — the cloak proc is a meaningful portion of raid-ready throughput and survivability.
Valor and Reputation Gearing
Valor Points from Flex, Normal, and daily sources can be spent on gear at the Shado-Pan Assault quartermaster on the Isle of Thunder. Reaching Friendly, Honored, and Revered with this faction — primarily through Throne of Thunder boss kills — unlocks increasingly strong pre-tier slots that fill BiS gaps before full Tier 16 sets come together.
Reforging matters: MoP's reforge system at the Ethereal Forge lets you shift secondary stats on any piece of gear. Always reforge excess Hit or Expertise over your caps into Critical Strike before anything else. Use a dedicated reforge addon or the WoWhead reforge optimizer for your spec to avoid wasting item budget.
---
Is Warrior Good for PvP in MoP Classic?
Arms Warrior is one of the most impactful PvP specs in MoP Classic — a perennial Gladiator pick that defines the 2v2 and 3v3 melee composition meta. Burst windows through Colossus Smash combined with the two-handed Execute phase make Arms terrifying for any clothie who drops below 20% health. Throwdown and Shockwave (Level 60 talent) offer ground-game control; Safeguard (Level 75) gives your partner meaningful defensive support.
Fury is a less common PvP pick — the Enrage dependency creates windows of vulnerability that skilled opponents exploit via Enrage-dispelling healers. It sees play in specific comps but Arms is the competitive default.
Protection does see some niche PvP play in battlegrounds as a flag carrier (with defensive cooldown stacking) but is not a rated PvP spec in 5.4.8.
---
FAQ
What is the best Warrior spec for leveling in MoP Classic?
Arms is the recommended leveling spec for Warrior. It deals consistent damage with a two-handed weapon, manages Rage well enough for solo questing, and provides Sweeping Strikes and Bladestorm for fast multi-mob pulls. Fury can level effectively too but is slightly more gear-dependent on crit to maintain Enrage uptime. Protection levels noticeably slower; only pick it if you are actively queue-tanking dungeons the entire way.
What Hit and Expertise do Warrior DPS specs need in MoP Classic?
Both Arms and Fury need Hit to 7.5% (2550 rating, or lower with racial bonuses for certain weapons) and Expertise to 7.5%. These caps eliminate your chance to miss or be dodged on special attacks. White swings (auto-attacks) have a higher dual-wield miss cap that is not practical to reach for Fury — focus only on the special attack caps and accept some white swing misses.
How important is Colossus Smash for both DPS specs?
Colossus Smash is the single most important rotational ability for Arms and Fury. Every other GCD in both specs is organized around maximizing damage inside its 6-second armor-reduction window. Delaying Colossus Smash by even two seconds is a meaningful DPS loss; every high-damage ability should be available to fire immediately when the debuff lands.
Should Protection Warrior use Shield Block or Shield Barrier?
The choice depends on damage type. Shield Block mitigates physical melee damage and should be kept rolling at high uptime (60-80% of a physical fight). Shield Barrier absorbs magic damage and should replace Shield Block during magic-heavy phases or predictable boss nukes. On many Siege of Orgrimmar bosses, you will alternate between the two based on the incoming damage pattern.
How do I get the Legendary Cloak on my Warrior?
The cloak comes from completing Wrathion's Legendary Questline — a multi-phase chain started in Pandaria that runs through gathering materials, completing valor-gated chapters, and ultimately clearing Siege of Orgrimmar. The final cloak upgrades are unlocked in Phase 5. Both DPS cloaks (Gong-Lu for Arms and Fury) and the tank cloak (Qian-Ying for Protection) are available from the same questline — you receive the version appropriate to your current loot specialization.
Is the Warrior Tier 16 4-piece worth getting for DPS specs?
Yes — the Tier 16 4-piece for Arms and Fury is a strong priority. The Death Sentence proc allows Execute to be used above 20% health, which is a significant overall DPS increase across any fight length. Pursue the 4-piece before optimizing individual item levels on off-tier slots.
---
- Siege of Orgrimmar Raid Guide — all 14 bosses, loot tables, and difficulty modes
- MoP Classic Phase 5 Overview — everything new in the final phase
- Death Knight Guide — the other melee powerhouse in SoO
- Paladin Guide — Retribution and Protection: Warrior's closest raid-role sibling
- Monk Guide — Brewmaster tanking compared to Protection Warrior
- Rogue Guide — fellow melee DPS and the comp partner Arms Warriors love