The complete Siege of Orgrimmar guide for MoP Classic — all 14 bosses across four wings, Tier 16 loot, Kor'kron Juggernaut mount, Heroic Garrosh tactics, and the legendary cloak finale.

Raid Guide · WoW MoP Classic Phase 5
The
Siege of Orgrimmar is the final raid of Mists of Pandaria Classic — fourteen bosses across four wings ending with
Garrosh Hellscream and the Heart of Y'Shaarj. It introduced
Flexible Raid difficulty to the game, offers
Tier 16 for every class, and sits at the heart of the legendary cloak questline's final chapter. Every serious MoP Classic raider ends their journey here.
What Is the Siege of Orgrimmar?
The Siege of Orgrimmar (SoO) opens in MoP Classic Phase 5 as the climactic raid of the entire expansion. Mists of Pandaria's overarching story concludes here: a combined Alliance and Horde force pushes through Orgrimmar itself, dismantling Garrosh Hellscream's Kor'kron war machine floor by floor until he is brought down in the chamber below the city.
The instance spans fourteen boss encounters divided across four thematically distinct wings. It was considered one of the most ambitious raids Blizzard had built at the time, blending outdoor sieges, underground dungeon crawls, and a multi-phase story finale. Phase 5 also brought the first iteration of Flexible difficulty to World of Warcraft, a middle tier sitting between Raid Finder and Normal that scales dynamically for groups of 10 to 30 players.
Raid entrance: Vale of Eternal Blossoms, Pandaria. The portal is located on the northern edge of the Vale near the ruins of the Golden Lotus shrines. No attunement is required for any difficulty in MoP Classic.
What Difficulty Modes Does SoO Have?
| Difficulty | Group Size | Gear (ilvl) | Lockout Type | Notes |
|---|
| Raid Finder (LFR) | 25 (auto-queue) | 528 | Per-boss, personal loot | Open queue; requires ilvl 496 minimum |
| Flexible | 10-30 players | 540 | Shared per-boss by leader | Scales difficulty to group size; cross-realm |
| Normal | 10 or 25 players | 553 | Weekly per ID | Warforged items can drop (+6 ilvl) |
| Heroic | 10 or 25 players | 566 | Weekly per ID | Warforged items drop; Kor'kron Juggernaut mount from Heroic Garrosh |
Flexible Raid — the Phase 5 innovation: Unlike Normal and Heroic which require exactly 10 or 25 raiders, Flexible scales for any group between 10 and 30. Difficulty and loot both scale with your group size. The lockout is leader-based, so latecomers can join mid-clear without losing progress. This was Blizzard's first attempt at cross-realm premade raiding below Normal difficulty.
What Are the Four Wings?
SoO is divided across four wings. LFR queues separate into four corresponding sections. On Normal and Heroic you clear all four in a single lockout.
Wing 1 — Vale of Eternal Sorrows
Bosses 1-4. The Vale itself, corrupted by Garrosh's actions, sets the scene. You fight the consequences of draining the sacred pools.
Bosses: Immerseus, Fallen Protectors, Norushen, Sha of Pride
Wing 2 — Gates of Retribution
Bosses 5-8. The outer walls and approaches to Orgrimmar. Heavy military encounters; a dragon, war machines, and Garrosh's inner guard.
Bosses: Galakras, Iron Juggernaut, Kor'kron Dark Shamans, General Nazgrim
Wing 3 — The Underhold
Bosses 9-11. Beneath the city, in the secret vaults and holding pens Garrosh built to house stolen Pandaren artifacts.
Bosses: Malkorok, Spoils of Pandaria, Thok the Bloodthirsty
Wing 4 — Downfall
Bosses 12-14. The inner sanctum, Garrosh's weapon foundry, and the final confrontation. The legendary cloak questline ends here.
Bosses: Siegecrafter Blackfuse, Paragons of the Klaxxi, Garrosh Hellscream
Wing 1 — Vale of Eternal Sorrows Boss Guide
Boss 1: Immerseus

Immerseus — Tears of the Vale
Corruption management fight
A sha-corrupted water elemental born from the drained Vale pools. The fight is a repeating two-phase loop. In Phase 1, you DPS Immerseus down to zero health — he then explodes into numerous Sha Puddles and Contaminated Puddles that scatter across the room. Phase 2 requires DPS to destroy Sha Puddles while healers cleanse Contaminated Puddles before they reach the center. Each puddle that makes it to the center reduces Immerseus's Corruption. The fight ends when his Corruption reaches zero. Key mechanics: Swirl (rotating frontal cleave — rotate out), Sha Bolt (player-targeted splash), Corrosive Blast (tank debuff, swap every two to three casts).
Boss 2: Fallen Protectors

Fallen Protectors — He Softfoot, Sun Tenderheart, Rook Stonetoe
Three-target council fight
Three corrupted Golden Lotus guardians fought simultaneously. They share a health pool — you cannot focus one down. Each Protector gains a Desperate Measures ability when reduced below 25% health, triggering a burst phase that must be managed before their health re-stabilizes. He Softfoot applies a stacking bleed; Sun Tenderheart summons a Sha Energy zone you must avoid; Rook Stonetoe periodically empowers both allies. Kill order and cooldown timing during the Desperate Measures windows are the core challenge.
Boss 3: Norushen

Norushen — Titanic Construct
Corruption cleansing mechanic
Norushen is a Titanic Watcher blocking progress. The fight revolves around Corruption: every player starts with 100 Corruption and deals reduced damage as a result. The boss sends players one at a time into a Test Realm where they complete a solo encounter to cleanse their Corruption to zero. Players returning from the Test Realm deal full damage and become critical to burning down the Amalgamation adds before they overwhelm the raid. Managing who enters the Test Realm and in what order is the whole fight.
Boss 4: Sha of Pride

Sha of Pride — the Seventh Sha
Wing 1 finale — Pride management
The wing finale and a story beat: the Sha of Pride has been growing inside Garrosh's prized Vale. Players accumulate a Pride resource throughout the fight from various raid mechanics. At 100 Pride a player is Mind Controlled and attacks their own team. Key sources of Pride include failing to dispel Bursting Pride quickly, being caught outside the Manifestation of Pride zones, and staying in Swelling Pride too long. The boss also periodically imprisons players who must be freed by others. Heroic adds a Reflections mechanic where shadow copies of raider abilities must be interrupted.
Wing 2 — Gates of Retribution Boss Guide
Boss 5: Galakras

Galakras — Last Brood of Galakrond
Two-phase tower assault
Galakras circles overhead until you bring her down by destroying her landing beacons. The fight splits into two phases. In Phase 1 your raid clears waves of Kor'kron ground forces while a dedicated sub-group climbs the two siege towers, kills mini-bosses at the top, and deactivates the Dragonmaw beacons calling Galakras back to the sky. Phase 2 begins when both beacons are destroyed and Galakras lands — a standard dragon tank fight with breath and tail swipe positioning. The coordination of your tower group is what determines Phase 1 speed.
Boss 6: Iron Juggernaut

Iron Juggernaut — Kor'kron Siege Engine
Assault and Siege phase rotation
A massive mechanical scorpion-tank guarding the gates of Orgrimmar itself. The Juggernaut alternates between two modes. In Assault Mode it moves freely, is tanked normally, and uses a Cutter Laser sweep that the raid must rotate out of. In Siege Mode it halts, stops single-target attacks, and blankets the room with Mortar Blasts, Borer Drill ground effects, and Explosive Tar pools. Healers work hardest during Siege Mode; the transition back to Assault Mode is signaled clearly. Watch the ground at all times.
Boss 7: Kor'kron Dark Shamans

Kor'kron Dark Shamans — Wavebinder Kardris and High Enforcer Tarak
Split-room positioning fight
Two corrupted shamans fought simultaneously but in different areas of the raid room — one inside the keep, one outside. The key mechanic is that they must not be within range of each other or they empower each other significantly. Tanks keep them separated for the whole encounter while the raid splits its healing. Kardris casts Foul Sleet (frontal) and Toxic Mist AoE; Tarak summons Earthbreaker Missiles that tile the ground with fire. Players who fail positioning bleed damage to the whole raid via Ashen Wall.
Boss 8: General Nazgrim

General Nazgrim — General of the Kor'kron
Rage management and Defensestance phase
General Nazgrim is a fan-favourite recurring NPC now standing as your enemy. He has a Rage resource; you cannot attack him directly while he is above 100 Rage, and he periodically enters Defensive Stance which absorbs all incoming damage — you must stop all DPS instantly or you fill his Rage. Nazgrim calls in Kor'kron reinforcement waves throughout the fight. Each wave includes a mix of melee, ranged, and healer NPCs. His add waves generate Rage if they land their abilities, so interrupting and quickly killing them is essential. He also uses a Battle Stance period where AoE is dangerous.
Wing 3 — The Underhold Boss Guide
Boss 9: Malkorok

Malkorok — Garrosh's Loyal Warrior
Ancient Barrier absorption fight
Malkorok has been transformed by the Blood of Y'Shaarj into a hulking Sha-infused warrior. His defining mechanic is the Ancient Barrier: damage he deals fills an absorption shield on all players. When the shield is active, healing overflows into health — when it breaks, players are immediately in danger with no buffer. Displaced Energy is a targeted spread mechanic that forces players apart. Sha Claws marks a player for a smash follow-up. His room is covered in Sha Puddles that persist and shrink the safe area over time. Phase 2 begins below 20% when he goes berserk — burn fast.
Boss 10: Spoils of Pandaria

Spoils of Pandaria — Titanic Vault
Split-room DPS race
Spoils of Pandaria has no single boss — instead your raid splits into two equal groups, each assigned to one half of a sealed vault. Each group must open and destroy crates of Garrosh's stolen Pandaren artifacts before a shared Activation Level reaches the cap. Crates contain a variety of Mogu and Mantid constructs including elite adds, ranged artillery, and whirlwind golems. The two groups must finish their side at roughly the same time or the surviving side ends up overwhelmed. Communication and equal DPS distribution are everything.
Boss 11: Thok the Bloodthirsty

Thok the Bloodthirsty — Devilsaur
Kite-and-shriek mechanics
Thok is Garrosh's pet Devilsaur, a massive predatory dinosaur. He periodically gains a stacking Acceleration buff that increases both his attack speed and move speed until the current tank breaks line of sight by running through a gate. Thok's Shriek silences all players for several seconds, preventing healing and spell use — raid cooldowns must be pre-positioned around Shriek casts. Keys to prisoners scattered around the room can be collected to unlock cages containing enslaved Pandaren who provide temporary buffs to the raid. The fight is a controlled chaos test of cooldown discipline.
Wing 4 — Downfall Boss Guide
Boss 12: Siegecrafter Blackfuse

Siegecrafter Blackfuse — Owner of Blackfuse Company
Assembly line sabotage encounter
Helix Blackfuse fights from behind his weapon assembly line while your raid both engages him directly and disrupts his production. A sub-group is sent up onto the assembly line to destroy weapons before they reach Blackfuse. Weapons that make it through become active floor hazards: Laser Turrets, Crawler Mines, and Electromagnets. The floor group must dodge whichever weapons were not sabotaged while burning Blackfuse down. On Heroic, all three weapon types can be active simultaneously, making floor management brutally demanding.
Boss 13: Paragons of the Klaxxi

Paragons of the Klaxxi — Nine Paragon Council
Rolling council fight — 9 total, 3 active at a time
All nine Klaxxi Paragons are present in the room. Three are active at any time. When one is killed, the other two active Paragons heal to full and a new Paragon joins with Paragon's Purpose, a stacking damage buff that grows with each kill. Every dead Paragon grants the surviving active ones a passive buff: healing orbs, increased strike damage, or haste auras. The nine Paragons are: Rik'kal the Dissector, Hisek the Swarmkeeper, Ka'roz the Locust, Korven the Prime, Iyyokuk the Lucid, Xaril the Poisoned Mind, Kaz'tik the Manipulator, Kil'ruk the Wind-Reaver, and Skeer the Bloodseeker. The fight demands clean individual mechanics from every raider since the room fills with overlapping abilities from multiple active bosses.
Boss 14: Garrosh Hellscream
Garrosh Hellscream — Warchief of the Horde
Final boss — Multi-phase encounter with Y'Shaarj
The encounter's final phase is the longest multi-phase boss fight in MoP Classic. Garrosh fights in his true form channeling the power of Y'Shaarj, the Old God whose heart he has been feeding. The fight has three distinct phases with a transition realm in between.
Phase 1 (100% to 10%): Standard engagement. Garrosh uses Whirling Corruption (charge + AoE — spread), Desecrate (ground zones), and Touch of Y'Shaarj (mind controls a player who can then spread it to others — interrupt and burn to break). At 10%, all raiders are drawn into the Heart of Y'Shaarj realm for a one-minute intermission.
Realm of Y'Shaarj (Intermission): Your raid faces Sha constructs and empowered vision adds. Destroy them and damage Garrosh before time expires. Each Realm visit increases Corruption on the raid.
Phase 2 (full health, expanded abilities): Garrosh returns at full health with a larger health pool and adds Empowered Whirling Corruption (fires Minions of Y'Shaarj on impact) and Empowered Touch of Y'Shaarj (transforms players into Sha). Periodic Realm of Y'Shaarj visits continue roughly every 2.5 minutes. When Garrosh hits 10% again, he heals to 25% and Phase 3 begins.
Phase 3 (final burn from 25%): All abilities are empowered. No new phase transitions. Kill speed is everything — there is no hard enrage, but Corruption and add accumulation eventually overwhelm the raid.
This is the fight where the legendary cloak's final passive, from completing Wrathion's questline, provides a meaningful survival edge in Phase 3.
What Loot Does Siege of Orgrimmar Drop?
Tier 16 Sets
Tier 16 pieces drop from five token bosses spread across the raid. Tokens are class-grouped into three types (Conqueror, Protector, Vanquisher) and turn in to corresponding vendors. The Tier 16 sets are themed around the Kor'kron war aesthetic — heavy plate for warriors, sha-infused robes for casters.
| Tier 16 Token Boss | Wing | Slot |
|---|
| Sha of Pride | Wing 1 | Chest |
| General Nazgrim | Wing 2 | Gloves |
| Thok the Bloodthirsty | Wing 3 | Helm |
| Siegecrafter Blackfuse | Wing 4 | Shoulders |
| Paragons of the Klaxxi | Wing 4 | Legs |
| Garrosh Hellscream | Wing 4 | Heirloom Weapon (class-based) |
Notable Drops and Mounts

Kor'kron Juggernaut
HEROIC GARROSH DROP
A mechanical scorpion mount that drops from Heroic Garrosh Hellscream. In MoP Classic the drop rate is 100% guaranteed on Heroic — every kill awards the mount. One of the most visually iconic rewards in the game.

Reins of the Kor'kron War Wolf
AHEAD OF THE CURVE REWARD
Awarded for completing the Ahead of the Curve: Garrosh Hellscream achievement — killing Heroic Garrosh before the next major phase releases. Time-limited and unobtainable once the window closes.

Tusks of Mannoroth
ULTRA-RARE COSMETIC — GARROSH
A cosmetic head-slot transmog item that replaces all helmets with massive demon tusks. Extremely rare random drop from Garrosh Hellscream on Normal and Heroic. One of the most coveted cosmetics in the game's history.

Heirloom Weapons
GARROSH DROP — SCALES TO 90
Class-specific heirloom weapons from Garrosh Hellscream that scale with character level. These include one-handers, staves, maces, and ranged weapons appropriate to each class. They are not just transmog — they are functional gear up to level 90.
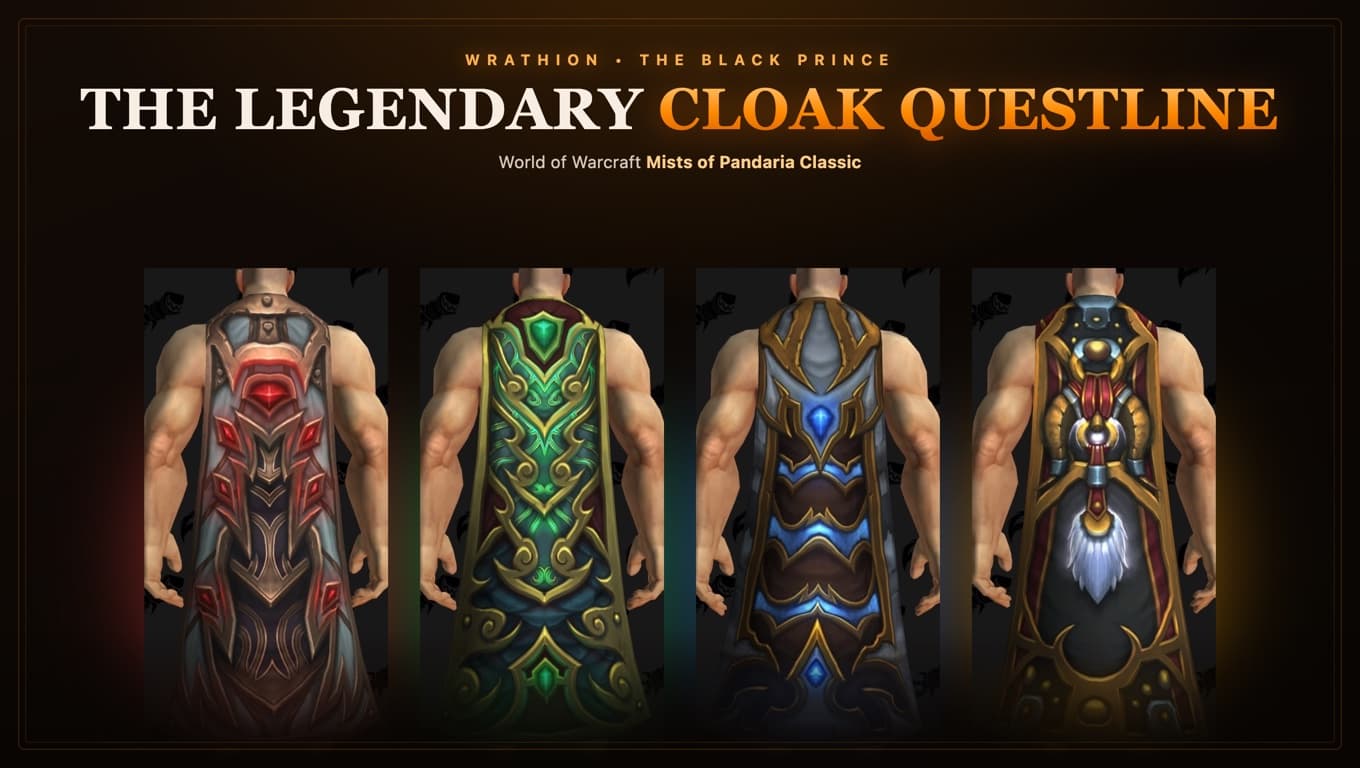
How Does the Legendary Cloak Questline End Here?
Phase 5 brings the final chapter of Wrathion's legendary questline: Chapter V — Judgment of the Black Prince. This is the payoff for months of progression through the earlier cloak chapters.
Chapter V Requirements
1. Timeless Coins: Collect 5,000 Timeless Coins on the Timeless Isle — earned from world mobs, treasure chests, events, and daily quests. The Timeless Isle is the Phase 5 outdoor content hub, accessible separately from SoO.
2. August Celestials: Defeat all four August Celestial world bosses on the Timeless Isle — Chi-Ji, Niuzao, Xuen, and Yu'lon. These are weekly spawns, so this step can take multiple weeks if you miss any.
3. Garrosh Hellscream: Defeat Garrosh Hellscream in Siege of Orgrimmar on any difficulty. LFR counts. This is the final requirement and completes Wrathion's story.
Reward: Completion upgrades your legendary cloak to its final form and permanently unlocks access to Ordos, the fire spirit world boss on the Timeless Isle that drops ilvl 559 gear — accessible only to players who have completed the legendary questline.
If you haven't completed the legendary questline: Chapter V has earlier requirements — Black Prince reputation, Titan Runestones, and Secrets of the Empire from earlier raid tiers. Phase 5's content is the finish line, not the starting point. Check Warcraft Tavern's full legendary questline guide before Phase 5 goes live if you're not already mid-chain.
How Do I Gear Up for Siege of Orgrimmar?
Getting into SoO in a useful state requires a clear gearing path. Here is the recommended progression:
| Gearing Step | Approx ilvl | How |
|---|
| Justice Point gear | 489-496 | Buy from faction vendors, no rep required in MoP Classic |
| Timeless Isle catch-up gear | 496 | Timeless Coins and drop-loot tokens on the Timeless Isle |
| Shado-Pan Assault gear (Valor) | 522 | Requires Friendly with Shado-Pan Assault; costs 34% less in Phase 5 |
| SoO LFR | 528 | Requires ilvl 496 minimum to queue; personal loot, no master loot drama |
| SoO Flexible | 540 | Best entry point for guild groups without strict 10/25 roster |
| SoO Normal | 553 (559 Warforged) | Structured guild runs; weekly ID lockout |
| SoO Heroic | 566 (572 Warforged) | Top-end progression; Kor'kron Juggernaut from Heroic Garrosh |
Valor Point tip: Cap Valor Points every week. They upgrade gear by 8 ilvl per upgrade (two upgrades per item for most Phase 5 gear), turning Normal SoO drops into near-Heroic ilvl pieces. Valor is earned from LFR, Flex, Normal, Heroic, daily heroics, and Timeless Isle quests.
Strengths and Weaknesses of Each Difficulty
When to Run LFR
+ No guild required — solo queue works
+ Personal loot prevents any drama
+ Available the same week Phase 5 opens
+ Counts for legendary cloak Chapter V
+ Best way to learn the fights first
When to Push Heroic
+ 566 ilvl is the highest gear available
+ Kor'kron Juggernaut guaranteed from Garrosh
+ Ahead of the Curve wolf mount window
+ Full Tier 16 Heroic set cosmetics
+ The hardest content MoP Classic offers
FAQ
How many bosses are in Siege of Orgrimmar?
Siege of Orgrimmar has 14 bosses total, divided across four wings: Vale of Eternal Sorrows (bosses 1-4), Gates of Retribution (bosses 5-8), The Underhold (bosses 9-11), and Downfall (bosses 12-14). Garrosh Hellscream is the final encounter.
What item level do I need to enter SoO LFR?
LFR requires a minimum of ilvl 496 to queue. The fastest way to reach that threshold in Phase 5 is through Timeless Isle coin-bought tokens (496) and Justice Point vendor gear (489-496), both of which are freely available without needing prior raid progress.
Does the Kor'kron Juggernaut drop on every difficulty?
No. The Kor'kron Juggernaut (mechanical scorpion mount) drops only from Heroic Garrosh Hellscream. In MoP Classic the drop rate is 100% guaranteed, meaning every successful Heroic Garrosh kill rewards the mount. The Normal difficulty Garrosh does not drop the Juggernaut.
Can I complete the legendary cloak questline in LFR?
Yes. Chapter V's final requirement is defeating Garrosh Hellscream in Siege of Orgrimmar on any difficulty — LFR counts. The earlier chapters of the questline (Secrets of the Empire, Titan Runestones, Black Prince reputation) require specific earlier-tier raids at specific difficulties, but the very last step is LFR-accessible.
What is Warforged gear?
Warforged is a bonus item quality that adds 6 ilvl to a piece of Normal or Heroic SoO loot when it drops. A Normal SoO item normally ilvl 553 becomes ilvl 559 Warforged. It is a random proc on each drop — you cannot target it. On Heroic, Warforged pushes items to ilvl 572.
What happens if I miss the Ahead of the Curve wolf mount window?
The Reins of the Kor'kron War Wolf is tied to the Ahead of the Curve: Garrosh Hellscream achievement, which expires when MoP Classic moves to its next phase. Once that window closes the mount becomes permanently unobtainable. The Kor'kron Juggernaut from Heroic Garrosh remains obtainable indefinitely.
Browse available
MoP Classic accounts to hit Siege of Orgrimmar ready to raid.